
Edited: If you make one, please add it to the Ravelry pattern page I made for this tutorial!

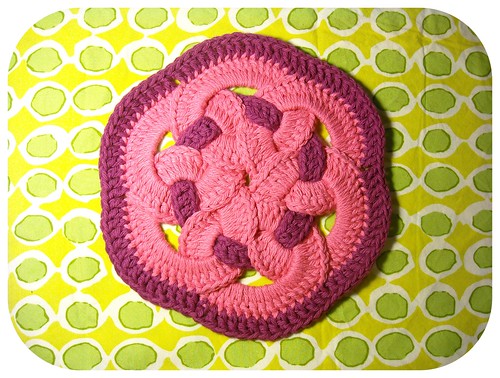
I'm so excited to share my first tutorial with you! I found the gold and pink crocheted trivet pictured below at the thrift store this weekend, and it was a total "I can make that" moment. The structure of the circles is made from plastic rings cut from one of those pieces that holds together a six-pack of soda. The hardest part will be in finding plastic rings that are actually circle. The sodas that were in my fridge (a Pepsi product) had "rings" that were more of an oval, almost D-like shape. Luckily I had a rounded version laying around, though I have no idea what kind of soda it came from. I am going to have to go to the 7-Eleven for research. The nice round ones may very well be from beer cans. The other kind may work, too, you would just have to adjust the pattern for the different shape. The original was made with acrylic yarn, but I felt that cotton gave it a better look and added heat resistance. Don't forget that there is still plastic in the rings! I don't think you have to worry, however, because the thrifted version was definitely used by someone, and other than a small spot on one edge where the acrylic yarn has been slightly melted, it is in great shape (the rings are fine!). If you're really worried about it or cannot find round soda rings, you could substitute canning gaskets or probably other circular things. Let's get started!
What you need:
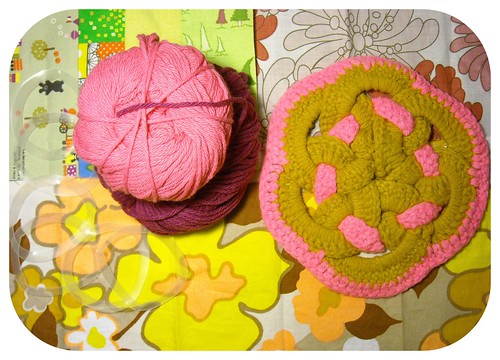
Worsted weight cotton yarn in colors that you like. I used Lily Sugar 'n Cream in Hot Pink and Lion Brand Lion Cotton in Orchid.
Round six-pack rings, trimmed apart into circles. They will not be perfectly circle and will have minor imperfections and stretched-out areas. See above photo on the left for what mine looked like. Don't worry about it too much because you won't be able to tell later. Just make sure the edges are smooth with no points.
Size H (5.0 mm) crochet hook

Begin by attaching your yarn with a slip stitch to a ring. Chain 3 and work 44 double crochet into the ring. Slip stitch to third chain of your beginning ch 3 to join. (See above and below. By the way, I took excruciatingly detailed pictures of pretty much every step, but I have come to the conclusion that I went overboard and they wouldn't be necessary. If you need any help with any of this, let me know and I can make the pictures available.)
If 45 dc seem to be too many or too few to fill up your ring, you can adjust accordingly! Weave in ends.
When I had made my six circles, I ironed them to get rid of a few bumps in the plastic I felt might show through. I used my iron's setting for polyester, and pressed each side of the circle for a short time. This isn't totally necessary, but I do think it helped.
Now lay them out like this with each ring overlapping the next:
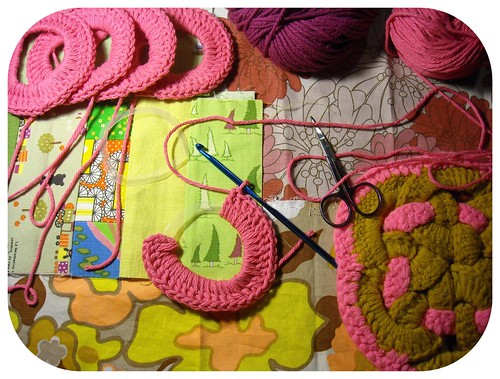
You're ready to make the center ring. I found the magic number for my beginning chain to be 45 (plus 3 for turning chain) again but before you commit to that length, weave the chain through the circles as shown below and remove chain stitches if necessary. A tiny bit of overlap is a good thing. Leave long tails for finishing off. So:
Chain 48, double crochet into the third chain from your hook. Double crochet in each remaining stitch.
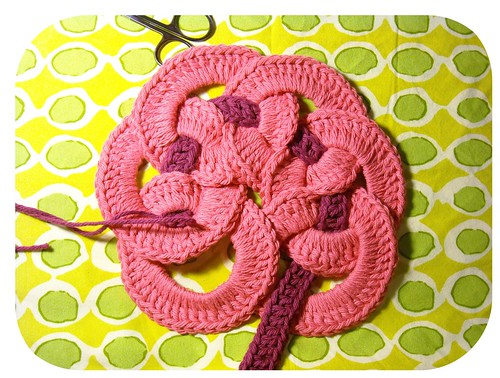
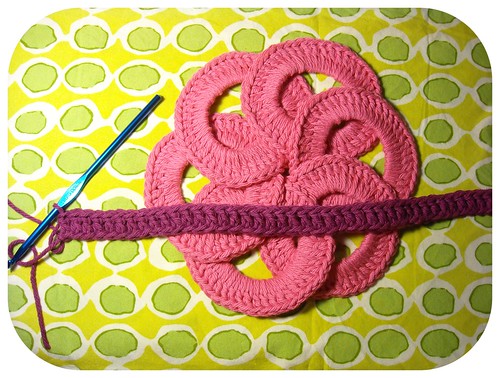
Weave your center ring through your circles as shown above. Adjust the ring to evenly show through each section. You should have a slight overlap as shown below.

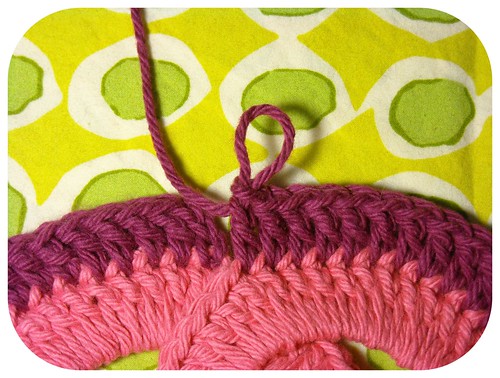
Fasten off behind a plastic ring, sewing the inner ring into a continuous loop. I did not attach it to anything but itself. Now you have a cluster of 7 interlocking rings. You need to crochet the border around the outer rings to hold everything together securely. The appropriate number of double crochets needed in each ring seems to be roughly a third of the number of double crochets you did into each individual ring.

As pictured above, attach your yarn with a slip stitch to the first loop that shows just to the left of the next ring.
Chain 3, double crochet in each double crochet up to the next circle. I used 14 in each circle. Fasten off, and you're done! Unless you want to add a decorative stitch to the edge, of course! I pressed it again with my iron on the polyester setting. Let me know if you make this. I'd love to see pictures!

Now this is an awesome pattern you've come up with! I love how it looks so complicated but is so darn simple! Something I will definitely be trying.
ReplyDeleteThanks for sharing!!!
Hugs & Blessings,
¸.•´¸.•´¨) ¸.•*¨)
(¸..•´ .•´ ¸¸.•¨¯`-:¦:Anita
I love, love, love this! Generous of you to photo and share this. I'll be making them for hostess gifts and stocking stuffers. Sorry, I don't know how to post photos. Betty
ReplyDeleteThank you so much for your wonderful tutorial. I just adore the retro look of the trivet.
ReplyDeleteThis is SOOOO COOL! Thank you *so* much for your generosity in sharing this pattern.
ReplyDeleteI have been looking for years for this!! THANK YOU!
ReplyDeleteCool. I remember making these when I was a kid for various elementary school teacher xmas gifts.
ReplyDeleteI can't wait to try this... am going to try with Lavender and lime green and try and see if I can square it off after and use this as the center of a baby blanket I am making for a friend. Thanks!
ReplyDeleteoh i really love it, but i'm just starting to crochet...i think i can do it really, but i don't understand how you get the yarn aroud the plastic rings...do you know what i mean-the knitting around the plastic...
ReplyDeleteIf you're having trouble getting started, check out my Flickr set for making the trivet. I made all of the photos from each and every little step public. Hope this helps! :)
ReplyDeleteYou do NOT have to begin with the plastic rings. Instead, you can substitute rings made by chaining 20 and then slip stitching to the first ch stitch to form a ring. Use that as the base instead of a plastic ring. Email me at adaiha @ gmail.com if you need more one-on-one advice! :)
I did make one of these yesterday and posted to my blog. It is a great pattern. Thanks for sharing.
ReplyDeleteWhat a great pattern! I can hardly wait to make it!!!
ReplyDeleteI have some plastic bracelets that I intend to try instead of the drink rings.
Thanks for an easy pattern that looks very complicated !!
Martha
Muchas gracias por el tutorial, recien conozco tu blog y volveré pronto un beso desde Argentina ♥
ReplyDeleteThe sixth or so picture looks kind of like a tree... And I love it! I think I need one/ am going to make it... thanks!!!
ReplyDeleteM
I, too, had found that hot pad in a thrift store, but am not that crafty to have figured it out. So glad that you did. Thank you.
ReplyDeleteThe only thing remotely similar (& free) I currently have to experiment with are plastic soda cup lids from QT. I'm cutting the insides of the lids out to make rings. Will try to return to let you know how it works. I've been looking for a way to recycle those darn things. They also come in different sizes. :)
ReplyDeleteCutting the center & the outer lip of the lid worked. I made 2 of them with different sizes. The blue rings make for a good sized one that would fit a large pot. It's a little over 12" in diameter.
DeleteHaven't had any trouble with it melting yet & I don't wait for a pot or pan to cool to use it. Just to clarify, these cup lids are the thick plastic colored ones that can be washed & reused.
Oh cool! Glad that worked for you. I have been using rings of chain stitches since I can no longer find nice soda rings, and I don't really drink that much soda anyway. I love being able to reuse what would otherwise be trash though! :)
DeleteI remember my grandmother and her sisters making these in the 1970s. I think I still have some of their originals around. Even back then they had difficulty finding enough truely round rings to crochet around. I can remember them discussing which brand sodas to buy so they would have the shape they wanted. Thanks for the memories!
ReplyDeleteHaha! I still haven't found the perfect rings since the first couple of trivets I made. I have found that a ring of 20 chain stitches works great!
DeleteI found one of these in a box of crochet stuff my step-grandmother had made when she was still around. I thought I'd have to take it apart to see how she made it. Thanks for saving me from frogging her work!
ReplyDeleteOh yay, glad I could help!
DeleteA lady at church asked today if I could make her one of these. She has one that is square. I'm pretty sure I can figure out how to make one. The only problem is the rings as I don't drink soft drinks or beer.
ReplyDeleteDo you think round plastic canvas would work?
I'm not sure if that would work, but I have made trivets without the plastic rings at all. Instead, just make 20 chain stitches and join with a slip stitch, then proceed with the tutorial by making dc stitches into the ring. This rainbow one was made that way and it came out great! :)
DeleteLOVE IT! Going to share on my FB page. I hope that's OK?
ReplyDeleteOf course :)
Deletec' est très beau ce que vous réalisez j' aime beaucoup vos couleurs je vais vous ajouter a mes ballades de blogs si vous souhaitez faire de même pour moi pas de soucis dane
ReplyDeletePrecioso trabajo, con la explicaciòn un 10!!!! Gracias, desde Bs.As. Renèe
ReplyDeleteThis is beautiful! Thanks for sharing. I will definitely try to make one, although I don't really understand how to begin with each circle...
ReplyDeleteI have a suggestion, though, to make the final, center ring. Instead of figuring out what length the stripe should be, use the Tunisian crochet method to work from the bottom up. This way you don't have to measure, and just stop when the length is right.
I hope this helps.